If you're looking to deploy your Python Flask web app on a Windows Server with a focus on handling high traffic and supporting many concurrent users, you're in the right place. In this guide, we'll walk you through the process of setting up the Flask application on Windows, configuring IIS as a reverse proxy, and ensuring your site performs well under heavy load.
What You Need:
⦁ Windows Server (with IIS installed).
⦁ Python installed (preferably Python 3.9 or later).
⦁ Flask web app ready to deploy.
⦁ Waitress (a production-grade WSGI server for Python).
⦁ URL Rewrite module and Application Request Routing (ARR) for IIS.
⦁ Installed NSSM (download from ⦁ nssm.cc).
Step-by-Step Deployment
Step 1: Install Python and Necessary Libraries
Before deploying your Flask app, make sure that Python and all necessary libraries are installed on your server.
⦁ Install Python:
⦁ Download and install the latest Python version from ⦁ python.org.
⦁ During installation, make sure to check ⦁ Add Python to PATH.
⦁ Install Flask:
⦁ Open Command Prompt and write following command to install Flask:
⦁ Install Waitress (WSGI server for Python):
⦁ Waitress is a production-ready WSGI server that will handle requests efficiently.
⦁ Install Waitress by running:
Step 2: Prepare Your Flask App for Production
Ensure your Flask app is ready to run in a production environment with Waitress. Here’s a basic Flask app example (app.py):
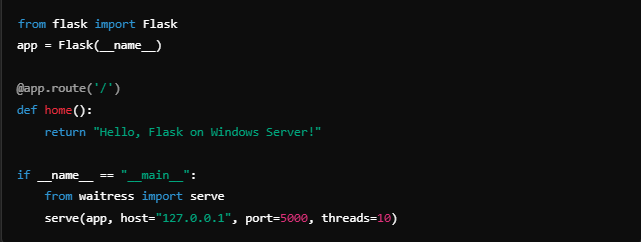
⦁ The serve() method will start the Waitress server on 127.0.0.1:5000.
⦁ The threads=10 option helps increase concurrency by handling more requests simultaneously. You can adjust the number of threads based on your server's capacity.
Step 3: Install IIS (Internet Information Services) and Required Features
You need IIS to handle web requests, manage SSL certificates, and route traffic efficiently.
⦁ Install IIS:
⦁ Open Server Manager.
⦁ Go to Add Roles and Features > Role-based or feature-based installation.
⦁ Select Web Server (IIS).
⦁ Click Next through the installation wizard.
⦁ Enable CGI and URL Rewrite:
⦁ In IIS Manager, enable CGI and URL Rewrite (for creating a reverse proxy).
⦁ To do this, navigate to IIS Manager > Your Server > Role Services, and enable both CGI and URL Rewrite modules.
⦁ Install Application Request Routing (ARR):
⦁ Download and install ⦁ ARR from the official Microsoft site.
⦁ ARR helps IIS handle high traffic and serve as a reverse proxy, forwarding requests to your Python Flask app running on Waitress.
Step 4: Configure IIS as a Reverse Proxy
Now that IIS is installed, we need to configure it to forward incoming web requests to your Flask app running on Waitress.
⦁ Enable Proxy Settings in IIS
⦁ Open IIS Manager.
⦁ On the left, select your Server node (not your site, but the root of the server).
⦁ In the middle panel, double-click Application Request Routing Cache.
⦁ On the right, click Server Proxy Settings.
⦁ Check Enable Proxy and click Apply.
⦁ Configure URL Rewrite for Reverse Proxy
Now, you need to configure the URL Rewrite module to forward incoming requests to your Flask app.
⦁ In IIS Manager, select your site (e.g., Default Web Site).
⦁ Double-click URL Rewrite under the IIS section.
⦁ On the right, click Add Rule(s)....
⦁ Select Blank Rule under the Inbound Rules section and click OK.
Configure the Rule
⦁ Name: Reverse Proxy Rule.
⦁ Requested URL: Choose Matches the Pattern.
⦁ Using: Choose Regular Expressions.
⦁ Pattern: Enter ^(.*)$ to match all incoming requests.
Action Settings
⦁ Action Type: Select Rewrite.
⦁ Rewrite URL: Enter http://127.0.0.1:5000/{R:1}. This forwards all incoming requests to your Waitress server running at 127.0.0.1:5000.
⦁ Check Stop processing of subsequent rules.
Click Apply to save the rule.
Step 5: Test Your Deployment
⦁ Start your Flask app with Waitress
⦁ Open a web browser and visit your site (e.g., http://yourdomain.com or https://yourdomain.com if using SSL).
You should see the Flask app responding through IIS.
Step 6: Optimize for High Traffic
For high traffic, it’s crucial to optimize your server and Flask app.
Optimize Waitress for Performance:
⦁ Increase the number of threads in the serve() method for more concurrency:
⦁ Connection Limit: Increase the connection limit if needed for more users:
Optimize IIS for High Traffic:
⦁ Request Queue: Increase the request queue size in IIS:
⦁ Go to IIS Manager > Your Site > Advanced Settings.
⦁ Increase Queue Length (e.g., 5000).
⦁ Application Pool:
⦁ Set the Idle Timeout of your application pool to 0 to prevent automatic recycling.
⦁ Enable Compression for better performance with static assets like images, CSS, and JavaScript.
Step 7: Set Up Flask App as a Service Using NSSM
To ensure your app runs continuously as a background service:
⦁ Download NSSM:
⦁ Go to https://nssm.cc/download.
⦁ Under the nssm (version e.g 2.24) section, click the download link for the ZIP file.
⦁ Extract the ZIP File:
⦁ Once downloaded, extract the ZIP file to a directory on your computer (e.g., C:\nssm-2.24).
⦁ Add NSSM to PATH (Optional):
⦁ For easier access, copy the nssm.exe file (located in the win32 or win64 folder inside the extracted directory) to a location in your system PATH (e.g., C:\Windows\System32).
⦁ Verify NSSM Installation:
⦁ Open a Command Prompt and type:
nssm version
If installed correctly, you’ll see the NSSM version information.
Create a Windows Service for Your Flask App
⦁ Open a Command Prompt with administrative privileges
⦁ Run the following command to create a new service:
nssm install MyFlaskApp (relevant name of your service)
⦁ A GUI window will appear. Fill out the fields as follows:
First provide the appropriate service name in the service name section
⦁ Path This is where you specify the path to the Python executable that will run your app. Click the Browse button next to the Path field. Locate the python.exe file used for your project. If you're using a virtual environment (e.g., venv), the path might look like this:
C:\<your project directory>\venv\Scripts\python.exe
⦁ Arguments
This is where you provide the command to run your main.py/ app.py file with Waitress. If main entry file name is main.py. then write following command
-m waitress --host=0.0.0.0 --port=5000 --threads=20 main:app
⦁ Startup Directory
It should be the folder containing your project files. Like:
C:\ <your project directory>\
Click Install Service and you are done. Now start the service by following command
nssm start <service_name_provided>
Conclusion
By following these steps, you’ve successfully deployed your Flask web app on a Windows Server with IIS as a reverse proxy. This setup is designed to handle high traffic and lots of concurrent users efficiently. With Waitress as the WSGI server and IIS as the reverse proxy, you ensure good performance and reliability for your web app.
By tweaking configurations and optimizing both Waitress and IIS, you can scale this setup to handle even more traffic and concurrent users.
This blog should serve as a clear, beginner-friendly guide for deploying Python Flask apps on Windows servers with high traffic and performance in mind.
Note: If you're using Waitress, restart it by stopping and restarting the service:
# Stop the Waitress server
taskkill /F /IM python.exe
# Start the Waitress server again
python -m waitress --host=0.0.0.0 --port=8080 myapp:app


![Web Dev Full Stack Course: 10 Best Full Stack Developer Courses [2025]](/static/blogs/6e60d544bdc04c64bab4cad24fead782.jpg)